The actual content inside the email editor is always contained inside an "Email Control", some core controls are:
These controls are displayed in the toolbox on the right-hand side inside the email editor.
It's possible to create custom Email Controls and use them for both Campaigns and Transactional emails. Follow this guide to create your own control. Our example is a control that allows for custom HTML to be pasted into the email using a text area, but the possibilities are endless.
Start by creating a new folder inside the "App_Plugins"-folder of your project, let's call it NewsletterStudioCustom (or whatever you would like.), and inside this a folder called CustomHtmlEmailControl.
Inside the folder create another folder called Models and add the CS-filers for the Data Model, View Model, and Control Type to this folder.
This model contains the data that your control must store, which could be raw HTML (as for the Rick Text-control) or image-urls, links, etc. Each time the control is used inside an email this model will be used to serialize and store the data.
In the model's folder, create a class called CustomHtmlEmailControlData.cs
public class CustomHtmlEmailControlData : EmailControl
{
    public const string Alias = "customHtml";

    public override string ControlTypeAlias => Alias;

    public string Html { get; set; }

    public Padding Padding { get; set; }

}
The view model is used when the Razor-engine renders the email, this is what will get passed down to the cshtml-view when the actual email is rendered.
In the model's folder, create a class called CustomHtmlEmailControlViewModel.cs
public class CustomHtmlEmailControlViewModel : EmailControlViewModelBase
{
    public string Html { get; set; }
}
The Control Type is the main definition for the Email Control, this class is responsible for processing data and also holds important meta-data about the Email Control (like alias, icon, etc.).
In the model's folder, create a class called CustomHtmlEmailControlType.cs
public class CustomHtmlEmailControlType : EmailControlTypeBase<CustomHtmlEmailControlData, CustomHtmlEmailControlViewModel>
{

    public override string Alias => "customHtml";
    public override string ViewRender => "/app_plugins/NewsletterStudioCustom/CustomHtmlEmailControl/view.html";
    public override string ViewEdit => "/app_plugins/NewsletterStudioCustom/CustomHtmlEmailControl/edit.html";

    public override string Icon => "icon-code";
    public override string IconSvg { get; }


    public override CustomHtmlEmailControlViewModel DoBuildViewModel(CustomHtmlEmailControlData model, EmailControlRenderingData renderingData)
    {
        // This method will be called once for each Campaign, this can be used to perform work that is not
        // unique to the recipient. In our case the content of the textarea will always be the same so we
        // can safely perform all our work here.

        var baseViewModel = new CustomHtmlEmailControlViewModel();
        baseViewModel.Padding = model.Padding;
        baseViewModel.Html = model.Html;

        return baseViewModel;
    }

    public override CustomHtmlEmailControlViewModel DoUpdateUniqueViewModel(CustomHtmlEmailControlViewModel model, IRecipientDataModel recipient)
    {
        // This method is called once for every recipient, the "model" object will be a clone
        // of the result from the DoBuildViewModel-method. Here we could update specific properties
        // based on the recipient. In our case we don't need to do this.

        if (recipient is SubscriberRecipientDataModel subscriberRecipient)
        {
            // A Campaign in sending
            // Do something with SubscriberRecipientDataModel
        }

        if (recipient is TransactionalRecipientDataModel transactionalRecipient)
        {
            // A Transactional Email is sending
            // Do something with TransactionalRecipientDataModel
        }

        return model;
    }

    public override CustomHtmlEmailControlData BuildEmptyInstance()
    {
        // This method is called to create an empty instance of the model,
        // used to set default values when the control is dragged from the toolbox into
        // the email.

        return new CustomHtmlEmailControlData()
        {
            Padding = Padding.Default,
            Html = "<p>Sample HTML</p>"
        };
    }

    public override void DoPrepareForEdit(CustomHtmlEmailControlData control)
    {
        // This method is called when the editor is loaded, here we can pass meta-data to the control
        // the meta data is not saved but only used for the front end editing
        control.Meta.Add("foo","bar");

        base.DoPrepareForEdit(control);
    }
}
After these classes have been created you need to tell Newsletter Studio about the EmailControlType, create a Composer and append it to the list of ControlTypes.
public class MySiteComposer : IComposer {
    public void Compose(IUmbracoBuilder builder)
    {
        builder.NewsletterStudio().EmailControlTypes.Append<CustomHtmlEmailControlType>();

        // or

        builder.NewsletterStudio().EmailControlTypes.InsertBefore<ImageEmailControlType,CustomHtmlEmailControlType>();
    }
}
When this is done the Email Control Type should show up in the toolbox, otherwise, you might need to go to "Administration -> (Workspace)" and configure the Allowed Email Controls.
We also need to add translations for our email editor so that we get a nice name in the UI. Create the folder App_Plugins/NewsletterStudioCustom/Lang and put a file called en-US.xml inside this directory. Use the following content:
<?xml version="1.0" encoding="utf-8" standalone="yes"?>
<language alias="en" culture="en-US">
  <area alias="ns">
    <key alias="control_customHtml">HTML</key>
    <key alias="control_customHtml_pasteHtml">Paste HTML</key>
  </area>
</language>
Note the alias, it's a combination of "control_" and the alias of the Email Control Type. This will ensure that English backoffice users get the right text in the UI, of course, you can use any language you like, this is standard Umbraco localizations.
Also, we need to create the html-views for the rendering and edit in the backoffice, create these two files as placeholders:
/App_Plugins/NewsletterStudioCustom/CustomHtmlEmailControl/view.html
<div>
    Custom HTML Control, render view
</div>
/App_Plugins/NewsletterStudioCustom/CustomHtmlEmailControl/edit.html
<div>
    Custom HTML Control, edit view
</div>
And finally, we need to render the cshtml-files for the control, there are several ways to create the cshtml-file to be rendered inside the email.
Render the view
The rendering inside the email is done by a razor-view that is based on the Email Control Alias in this case customhtml.cshtml. If you're using a custom Themes you can put the Themes/{YourTheme}/Views/Controls/-folder but if you don't use a custom Theme and only want to provide the rendering you can put the file in the "magic" override-folder App_Plugins/NewsletterStudioExtensions/Views/Controls. Any view in this folder will overwrite the rendering in the Default-Theme.
Add the following folder: App_Plugins/NewsletterStudioExtensions/Views/Control and put the customhtml.cshtml file in this folder. Add the following content to the file:
@inherits NewsletterStudio.Web.Rendering.TemplateBase.RazorTemplateFolderHost<NewsletterStudio.Core.Rendering.ViewModels.ControlWithEmailViewModel>
@using NsTest.App_Plugins.NewsletterStudioCustom.CustomHtmlEmailControl.Models
@{
    var settings = Model.Email.Settings;
}

@if (Model.Model is CustomHtmlEmailControlViewModel customHtml)
{
    @Html.Raw(customHtml.Html)
}
The new control icon should now appear in the toolbox in the backoffice. And you should be able to drag it into the content of the email.
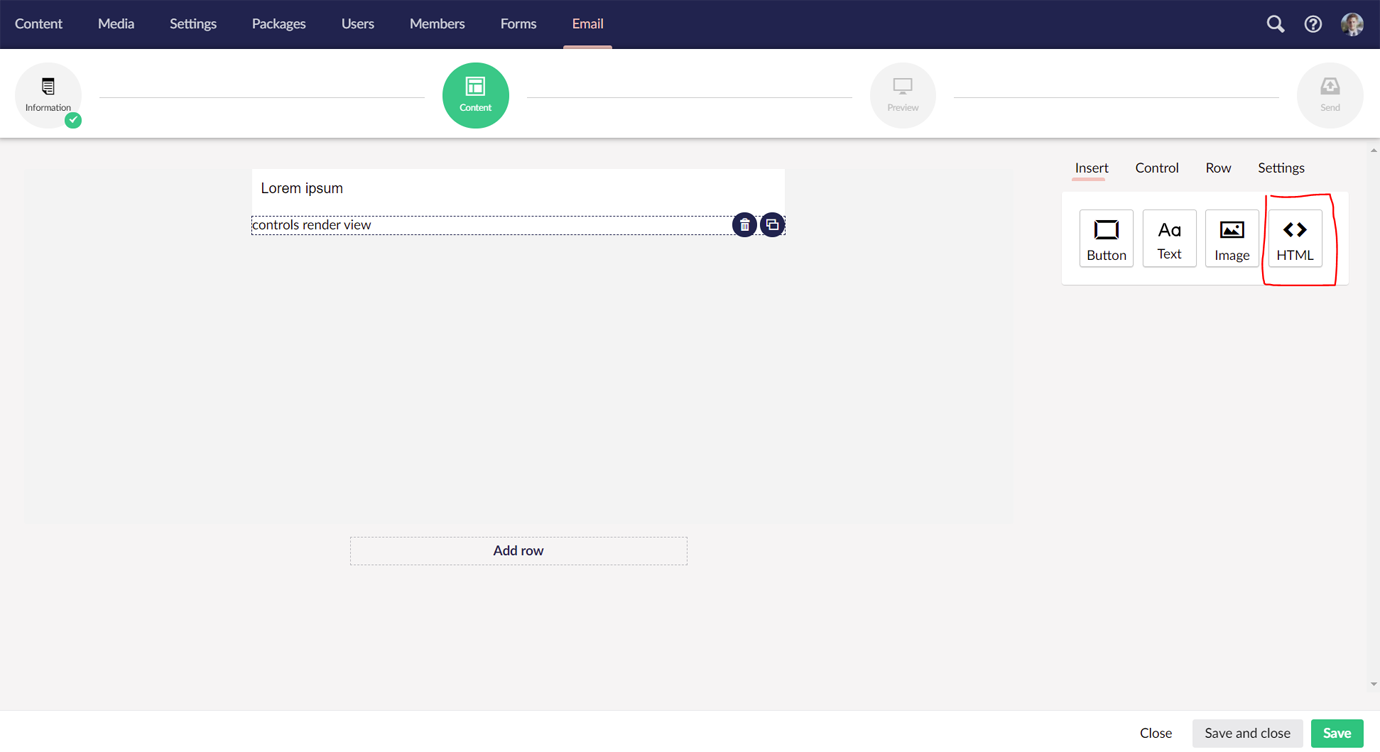
The two html-files we just created are used to build the editor experience in the backoffice. The "view.html"-file is what will be visually rendered in the email when editing and "edit.html" is will be rendered inside the toolbox on the right-hand side when the control is selected.
To create some more functionality we need to work on these views so that we can input and render data. Let's start with adding a controller for the edit-view.
Inside the CustomHtmlEmailControl-folder, add a file called edit.controller.js, with the following content:
angular.module("umbraco").controller('NewsletterStudioCustom.CustomHtmlEmailControl.EditController',['$scope',function($scope) {

    var editVm = this;

    editVm.init = function(emailEditor, control) {
        editVm.control = control;
    }

    var evtHandler = $scope.$on('nsSelectedControlChanged', function ($event,control) {
        editVm.init(null, control);
    });

    $scope.$on('$destroy', function(event, args) {
        evtHandler();
    });

    return editVm;

}]);
We also need to tell Umbraco to load this file into the backoffice, create a package.manifest-file inside the NewsletterStudioCustom-folder with this content:
{
  "javascript": [
    "/App_Plugins/NewsletterStudioCustom/CustomHtmlEmailControl/edit.controller.js"
  ]
}
Now, update the edit.html and add a textarea to input the custom HTML:
<div ng-controller="NewsletterStudioCustom.CustomHtmlEmailControl.EditController as editVm"
     ng-init="editVm.init(vm,vm.selectedControl)">

    <div class="ns-property-group">
        <ns-umb-property label="ns_control_customHtml_pasteHtml" description="">
            <textarea ng-model="editVm.control.html" rows="10" style="width:100%">
            </textarea>
        </ns-umb-property>
    </div>
    <div class="ns-property-group">
        <ns-umb-property label="ns_margin" description="">
            <ns-margin-editor ng-model="editVm.control.padding"></ns-margin-editor>
        </ns-umb-property>
    </div>
</div>
NOTE: Here you can see that we're using the ng-init-directive to call the init-method on our controller and pass in the currently selected control, this way the controller will get a reference to the selected control. The object vm.selectedControl is the actual data model that will be stored for this control, in our case, it looks something like this:
{
  "controlTypeAlias": "customHtml",
  "html": "",
  "rowAndColumnInfo": {
    "columns": 4,
    "stackOnSmallScreen": false
  },
  "meta": {
      "foo" : "bar"
  }
}
The "meta"-property can be used to pass meta-data from the server to the email control and is not stored in the database.
We're using the "controller as" approach for our views inside the editor and our controller is named vm so avoid using this as your controller name inside the custom views for Email Controls.
Next, we need to make sure that the preview is rendering the content from the textarea, edit view.html to look like this:
<div ng-style="{'padding-top' : control.padding.top,
                'padding-bottom' : control.padding.bottom,
                'padding-left' : control.padding.left,
                'padding-right' : control.padding.right,
                }"
    >
    <ns-html html="control.html"></ns-html>
</div>
This is using the custom "ns-html"-directive that we ship to render "raw" HTML inside the views.
With all this in place you, should have a working Email Control for adding Custom HTML into the body of the email.