Note! You are looking at documentation for an old version of the package. Go here for the latest documentation.

​If you prefer you could set all your settings directly in the /config/newsletterStudio.config-file in the Newsletter Studio folder or use Settings-section in the back office.

Install ---settings

Outgoing e-email settings

Newsletter Studio supports multiple SMTP-servers and will spin over all of them during send out.

  • Host - The SMTP-server for outgoing e-mail
  • Port - Default is 25.
  • Username - Username for server if required
  • Password - Username for server if required
  • Enable SSL - If checked an secured connection will be used.

If you want Newsletter Studio to "fall back" on the SMTP configured in the root we.config, just open the "/config/newsletterStudio.config" and remove all smtp-servers from the list. This will for example enable you to use the Pickup Directory feature of ASP.NET.

Other settings for outgoing email

  • Default sender name A default name of the e-mail sender that will be added to any created newsletter.
  • Default sender e-mail A default sender e-mail that will be added to any created newsletter.
  • Force sender defaults If set to true, the editor will not have the option to edit the name and e-mail of the sender, the specified defaults will always be used.
  • Jump to next server after This option specifics the number of emails to send on each sever before jumping to the next.
  • Throttling enable Use throttling to hold the send out for x seconds. This could be used to prevent your server from being flagged as a SPAM-server. Only needed in very email intense applications.
  • Throttling messages per batch Number of messages before holding send out
  • Throttling seconds between batches How long should the send out pause.


Google Analytics Tracking

When using the tracking Newsletter Studio has good preconfigured values for the tracking urls, but you can override them if you want to. The default way to use Google Tracking is to just leave the fields medium, source, name and content blank - this will give you the default settings.

  • Enable Google Analytics Tracking - Check this to enable the tracking. This will add Google Analytics tracking to all urls pointing to the internal site. External links will stay untouched. Source will be "NewsletterStudio", medium "email" and the Campaign name will be the same as the newsletters name.
  • Medium (Optional) For utm_medium-querystring to identify a medium such as email or cost-per- click. Example: utm_medium=cpc, utm_medium=email
  • Source (Optional) For utm_source to identify a search engine, newsletter name, or other source. Example: utm_source=google
  • Name (Optional) For utm_campaign to identify a specific product promotion or strategic campaign. Example: utm_campaign=spring_sale. If you leave this blank the name of the current email will be inserted.
  • Content (Optional) Use utm_content to differentiate ads or links that point to the same URL. Examples: utm_content=logolink or utm_content=textlink. If you leave this blank the subject of the current email will be inserted.


Bounce handling

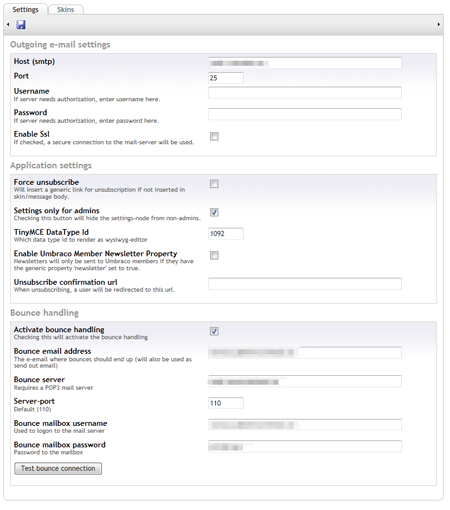
The bounce handler uses a POP3 e-mail account to receive all the replies from subscribers that aren't available for some reason. The handler will figure out the problem based on the reply and it will delete the replay and put the subscribers status to "error", after many bounces the subscriber will be unsubscribed depending on the settings in application settings.

  • Activate bounce handling - If checked the bounce handler will run as a scheduled task every 15 minutes.
  • Bounce e-mail - The address to be the "sender" of all newsletter and also the receiver of any bounce responses.
  • Bounce server - The address or IP to POP3 server.
  • Server port - The port to use. (Default is 110)
  • Bounce mailbox username - Username for mailbox
  • Bounce mailbox password - Password for mailbox


You can check your bounce mailbox settings by clicking on the "Test connection"-button.
 

Using a fake-smtp

When testing the product and while developing you solution it's great to have a "fake smtp server". We recommend Papercut which can be found on GitHub:

https://github.com/ChangemakerStudios/Papercut-SMTP 


More articles on "Getting Started"

How to install Newsletter Studio

The installation is extremely simple, just go to the developer section of your back office, click packages/packages repository and search for Newsletter Studio. Once you find it, just click install.​The installation will automatically take care of all the setup and configuration the only thing you n…

Read article

Skins

In the settings section you'll also find the "Skin"-tab. A skin contains the overall layout of the newsletter and might include headers, standard footer and so on. The skin and the message content will be merged by the rendering engine. Custom markup There are a couple of tags that you can use in y…

Read article